This guide walks through building the Demo Game’s Steam side yourself, in order, so you know what each piece is for and which parts need no code. Every screenshot is the finished Demo Game (Template) sample, so you can open it beside your own project and compare. Read Flow-and-Code-Free.md first if you want the picture before the steps.
The networking library is left out on purpose. Steps 1 to 8 give you a working lobby, colour choice, a match scene and a leave button with no networking at all. Step 9 is where a library plugs in, and Demo Game: Steam authentication covers the part people most often get wrong.
What you need #
- Unity 6.
- Toolkit for Steamworks and Foundation for Steamworks, installed with the Heathen Toolbox. It brings Steamworks.NET and Game Framework with them.
- Steam running and signed in.
- A Steam App ID. Use
480(Spacewar) to test. It is public and shared, so never put anything private in an app that uses it.
Step 1. Configure Steamworks #
Open Edit > Project Settings > Subsystems > Steamworks.
- Enter your App ID (
480for testing). - Tick Allow Listen Server. The host in this game runs a Steam Game Server, and without this setting it refuses to start.
- Open the Server Defaults tab and turn Auto Initialise off. The demo starts its server when a session starts, not when the game does.

You should see the Ready badge on the left of the toolbar once the app ID is accepted.
Step 2. Make the three scenes #
The demo uses one scene that is always loaded and two that are loaded on top of it. This is a good pattern for any game, and it is what keeps the camera, the event system and the network alive while the menu and the match swap in and out.
| Scene | Holds | You press Play in it? |
|---|---|---|
1) Bootstrap (start here) |
Camera, event system, the flow controller, the network | Yes, always this one |
2) Menu |
Friends, lobbies, colour choice, leaderboards | No |
3) Session |
The arena, the players, the scoreboard | No |
Create all three in Assets > Create > Scene. The menu and session scenes have no camera and no event system of their own.
Step 3. Build the bootstrap scene #
In the bootstrap scene add four objects.
- Main Camera with a
DemoFollowCamera. Its starting pose is the pose the menu is framed for. - EventSystem.
- Session Flow with a
DemoSessionFlow. Drag the camera into Camera Rig and type the exact names of your menu and session scenes into Menu Scene and Session Scene. - Network: your networking component. The Template ships
PlaceholderNetworkhere, which has no real network and spawns a local pawn so everything else can be tried first.
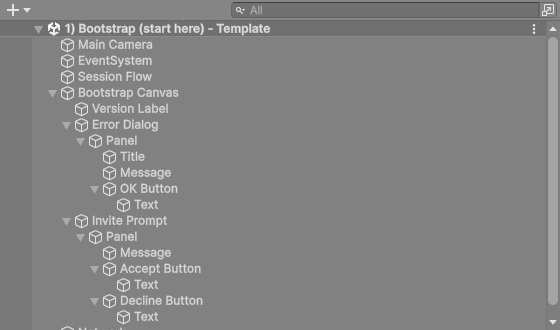
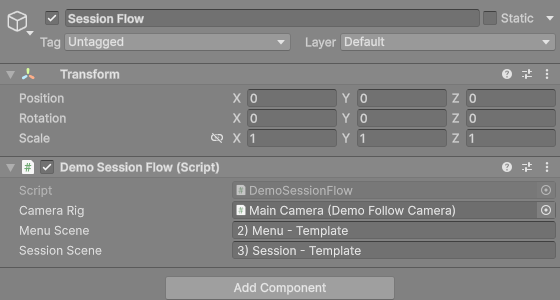
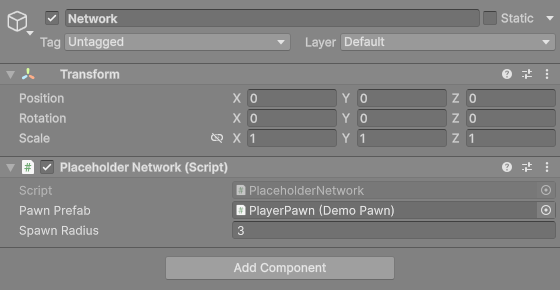
The Bootstrap Canvas holds an error dialog, an invite prompt and a version label. They are optional, but the error dialog is how the flow tells a player something went wrong.
No code needed: none of this needs you to write anything. DemoSessionFlow is a demo script you add and fill in.
Step 4. Build the menu scene #
The menu is almost entirely Toolkit components wired to buttons.
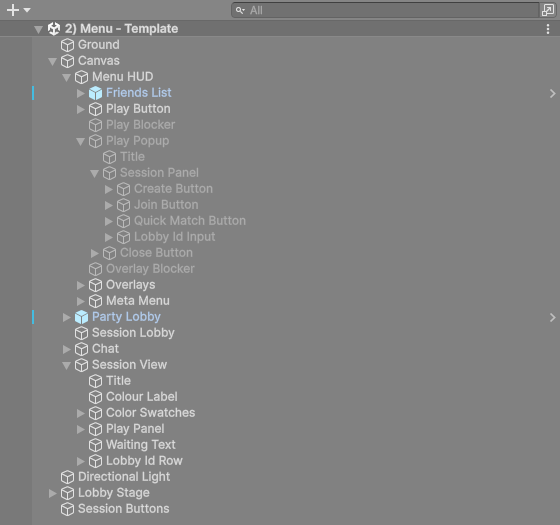
The lobby object #
Make an empty GameObject called Session Lobby and add the lobby components. In the Inspector they appear together as one Lobby panel with a section for each job.
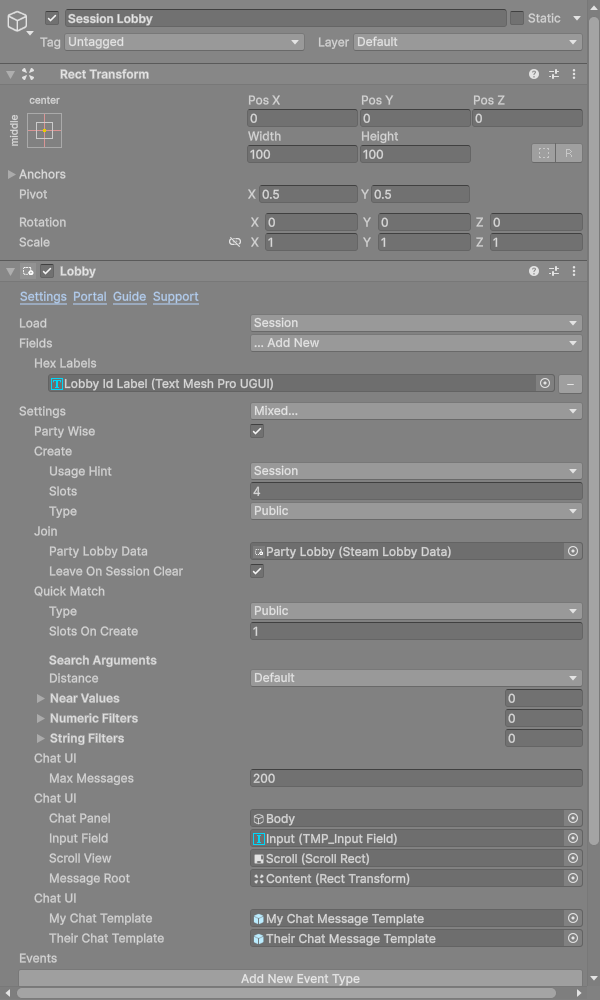
| Component | What it does |
|---|---|
SteamLobbyData |
Holds the current lobby and tells everything else when it changes. Set Load to Session. |
SteamLobbyCreate |
Creates a lobby. Usage Hint Session, Slots 4, Type Public. |
SteamLobbyJoin |
Joins a lobby by ID. |
SteamLobbyQuickMatch |
Joins any open session lobby. |
SteamLobbyLeave |
Leaves the lobby. |
SteamLobbyChatUI |
Drives a chat panel, input field and message list. |
SteamLobbyGameServer and SteamLobbyDataEvents |
Let the lobby carry the host’s Game Server and raise events when its data changes. |
SteamLobbyHexIdLabel |
Shows the lobby ID in a label so players can share it. |
Party lobbies are optional. The Party Wise box and the Party Lobby Data field are for letting a party follow its leader, and Lobbies-and-Parties.md explains them. Leave them out for a first version.
Wire the buttons #
Make a Play button that opens a popup, and inside it a Create, Join and Quick Match button plus a text field for a lobby ID. Each button calls a method on the lobby object through its On Click list.
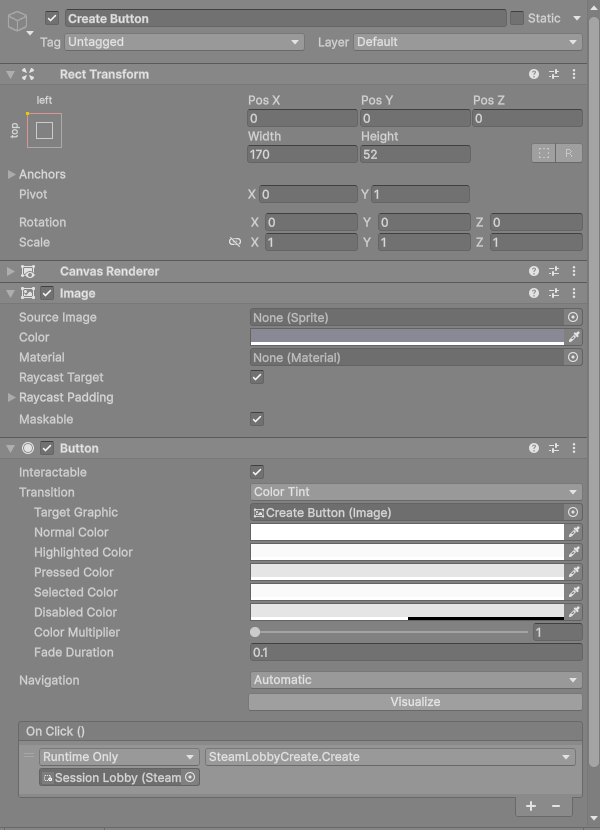
This is the whole trick: the Create button’s On Click points at the Session Lobby object and calls SteamLobbyCreate.Create. Join and Quick Match work the same way with SteamLobbyJoin and SteamLobbyQuickMatch. Leave calls SteamLobbyLeave.Leave, with a single entry in the list.
No code needed: creating, joining, quick matching and leaving a lobby, the chat, the member list and the lobby ID label are all components and button wiring.
Show the right screen at the right time #
SteamLobbyGameObjectEnabler switches a whole screen on or off from lobby state. The Menu HUD is enabled while no session lobby is set, and the Session View while one is. The Start Session button sits behind an enabler set to AmITheOwner, so only the lobby owner sees it. Everyone else sees a waiting message.
No code needed: the swap between “browsing” and “in a lobby” uses no script.
Step 5. Let players pick a colour #
Add LobbyColorAssignment to the Session Lobby object. Point Lobby at the lobby’s SteamLobbyData and set Color Count to 4.
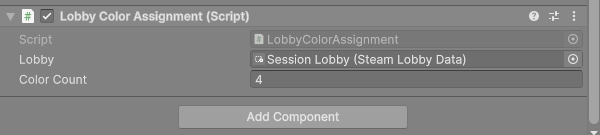
Make four swatch buttons and set each one’s On Click to LobbyColorAssignment.RequestColor with the swatch’s index.
A player writes a request into their own lobby member data. Only the lobby owner checks it and writes the approved table to the lobby, and a colour that is already taken is rejected. This is the one piece of game logic in the menu, and it is a small script because the rule is yours.
Step 6. Start the session #
The menu and the bootstrap scene cannot point at each other’s objects, because a button event cannot reference another scene. DemoSessionButtons is the small bridge. Add it to an object in the menu scene, and set the Start Session button’s On Click to DemoSessionButtons.StartSession.
When the lobby owner presses it, DemoSessionFlow does the rest: it locks the lobby, copies the colour table out, starts the Steam Game Server and the host, and loads the session scene. Every other member hears the host’s Game Server ID from the lobby and connects to it.
Step 7. Build the session scene #
The session scene is the match itself.
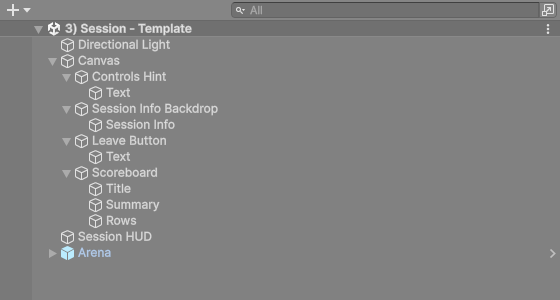
- An Arena: ground and walls.
- A Canvas with a Scoreboard (
DemoScoreboard), a Session Info label and a Leave Button. - A Session HUD object with
DemoSessionHud. Drag the Session Info label into Info.
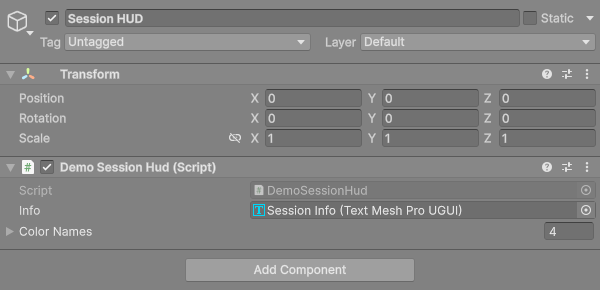
Set the Leave Button‘s On Click to DemoSessionHud.Leave. That calls DemoSessionFlow.ReturnToMenu, which stops the network, unloads this scene and loads the menu again.
Step 8. Put the scenes in the build #
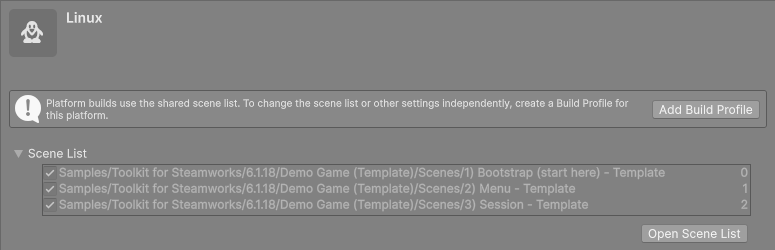
Add the three scenes to the build, with the bootstrap scene first. The order is how the player build knows what to start.
Step 9. Add your networking and authenticate #
So far no networking library has been involved. This is where one plugs in.
- Follow
Integrating-Networking.mdto write aDemoNetworksubclass for your library. The five finished samples (PurrNet, FishNet, Mirror, Netcode for GameObjects and Netcode for Entities) are worked examples of exactly this step. - Make every client prove who it is with Steam before it gets a player. This is the step most often done halfway, so it has its own page: Demo Game: Steam authentication. The short version is that the client asks Steam for a ticket, the server checks it with
Server.BeginSessionand checks the return value, creates the player only after Steam confirms, and callsServer.EndSessionwhenever a player leaves.
Step 10. Test it #
- Open the bootstrap scene and press Play. Never press Play in the menu or session scene: they have no camera or event system, and the menu will warn you.
- Press Play, then Create. A lobby ID appears.
- Pick a colour. Your capsule changes colour.
- Press Start Session. You drop into the match as the host, and the scoreboard shows you.
- For two players, use two machines with two Steam accounts on the same App ID. The second player presses Join and pastes the ID, then the first presses Start Session.
Testing.md has the full checklist and Demo Game troubleshooting covers the usual causes when something does not work.
What needed code, and what did not #
| Part | Code |
|---|---|
| Creating, joining, leaving and quick matching a lobby | None |
| Chat, member list, lobby ID, friends list, invites | None |
| Switching screens by lobby state | None |
| Tabs and popups | A demo script you add and fill in |
| Colour choice with owner approval | A small script, because the rule is yours |
| The bridge between scenes and the session flow | The demo scripts, copied and adapted |
| Authentication and the network library | Yours to write, with worked examples |
| The game itself | Yours |